

DIY Fireside Cooler Table Tutorial

There’s not much I love more than enjoying a cold beverage while sitting beside a campfire. We’ve been needing a side table for our fire pit area for a while now, so instead of building a regular table, I made one that houses our little cooler! Now we can have ice cold bevs on hand while we’re enjoying the backyard!
Want to build your own cooler table? Just follow the tutorial below!
You’ll need:
A cooler
Drill
18 gauge brad nailer
Cedar 1x4s
1x2s
Cedar fence boards (lumber quantities will depend on the size of the cooler you’re building the table around)
2in exterior screws
1 1/4 in exterior screws
3/4 in screws
Flat metal plates
Small hinges

Step 1:
Make the corner uprights
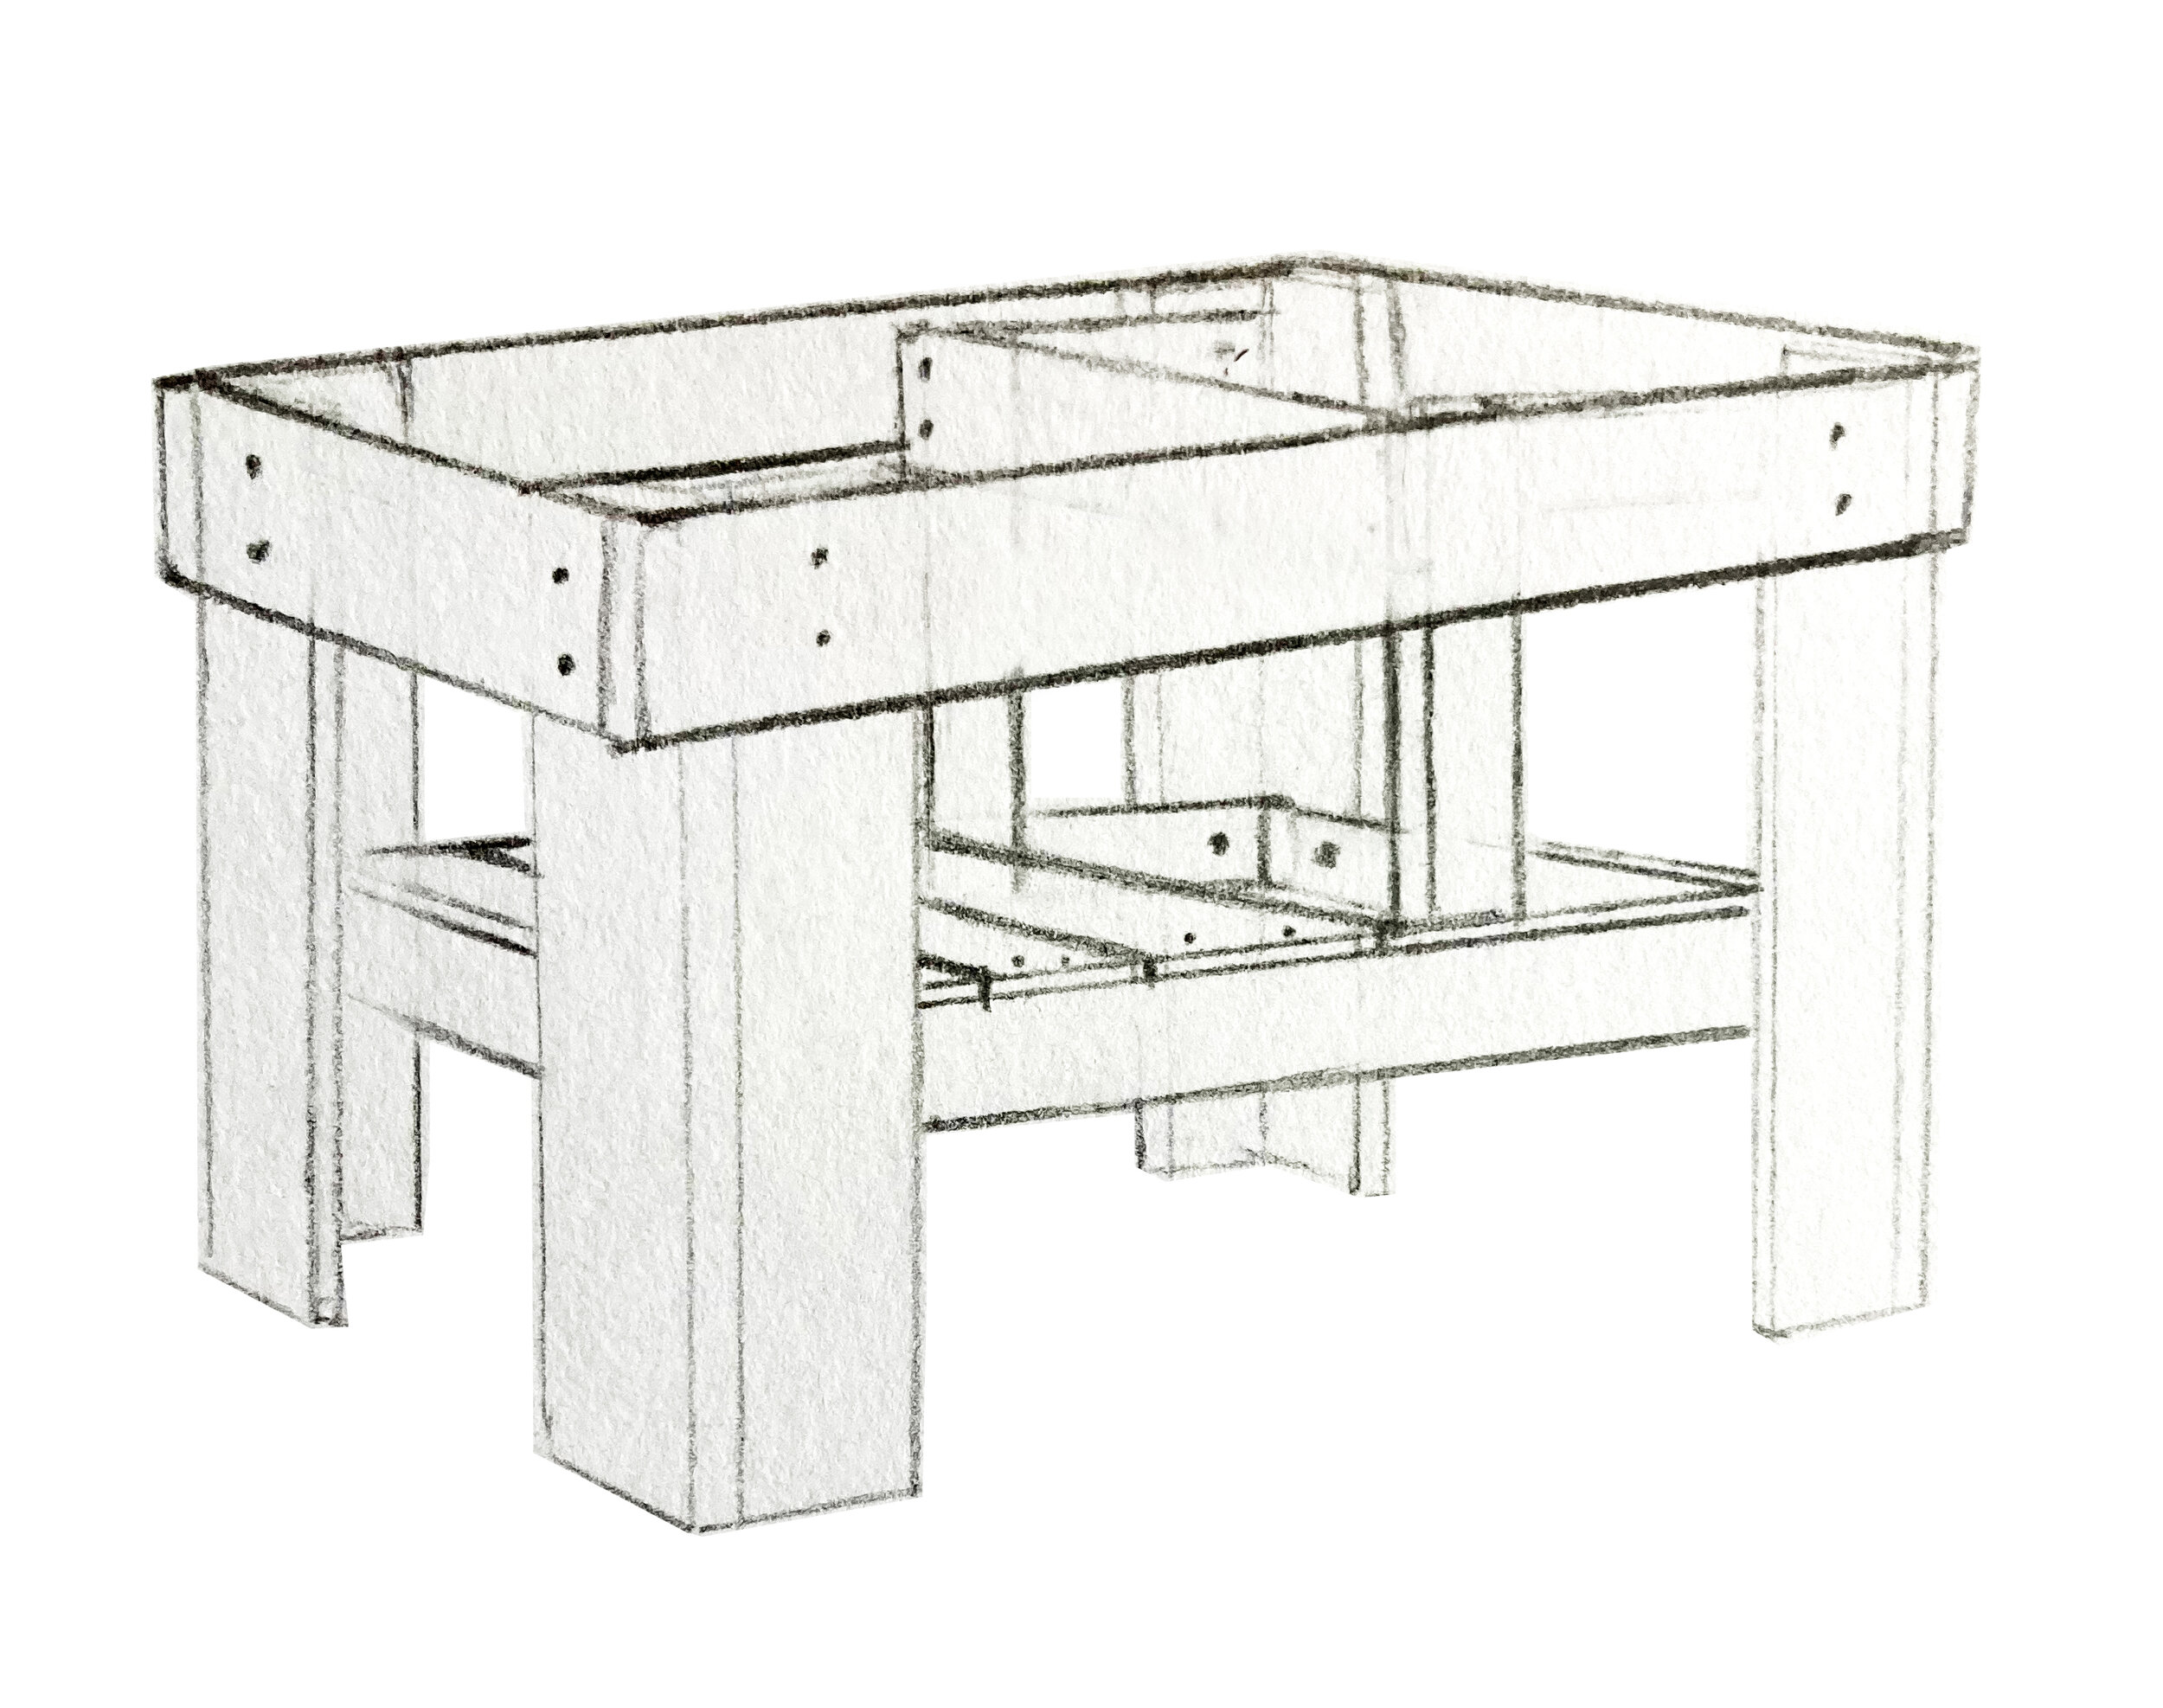
Cut your cedar 1x4s into eight 22in lengths (or longer if you want your table higher). These will be the corners of your table. Drill pilot holes and then screw them together in an “L” at a right angle using 2 in exterior screws. I put 3 screws in each.

Step 2:
Make the basic structure
Attach 1x2s to the corner pieces to connect them all together. This will be what the platform for your cooler sits on, so you’ll want to measure the height of your cooler, and then add a half inch— that’s how far down from the top of the corner pieces you’ll attach these 1x2s. The length and depth of your table will depend on the size of your cooler. I’d measure the short side 1x2s to be about an inch larger than your cooler’s depth. If you want to have a table section that doesn’t open (like mine), measure the width of your cooler and add about 10-12inches. This will how long you want your long side 1x2’s to be. Drill pilot holes in the 1x2s before screwing them to the corner pieces and then attach wth 1 1/4 in exterior screws.

Step 3:
Create the platform for the cooler
Cut cedar fence board that span across and rest on top of the 1x2s. This will be the platform that your cooler sits on. Use an 18 guage brad nailer to attach the boards to the 1x2’s
(image is viewing from the top down)

Step 4:
Create an interior wall to secure the cooler
This step is probably unnecessary, but I wanted to create a little barrier so the cooler didn’t scoot over under where the table top doesn’t hinge open. This just keeps the cooler snug in it’s spot. I did this by framing a barrier using 1x2s (which is what I had on hand), but you could also just add another cedar 1x4 to the outside of the platform base 1x2s and then do a cedar fence board across the top from front to back.

Step 5:
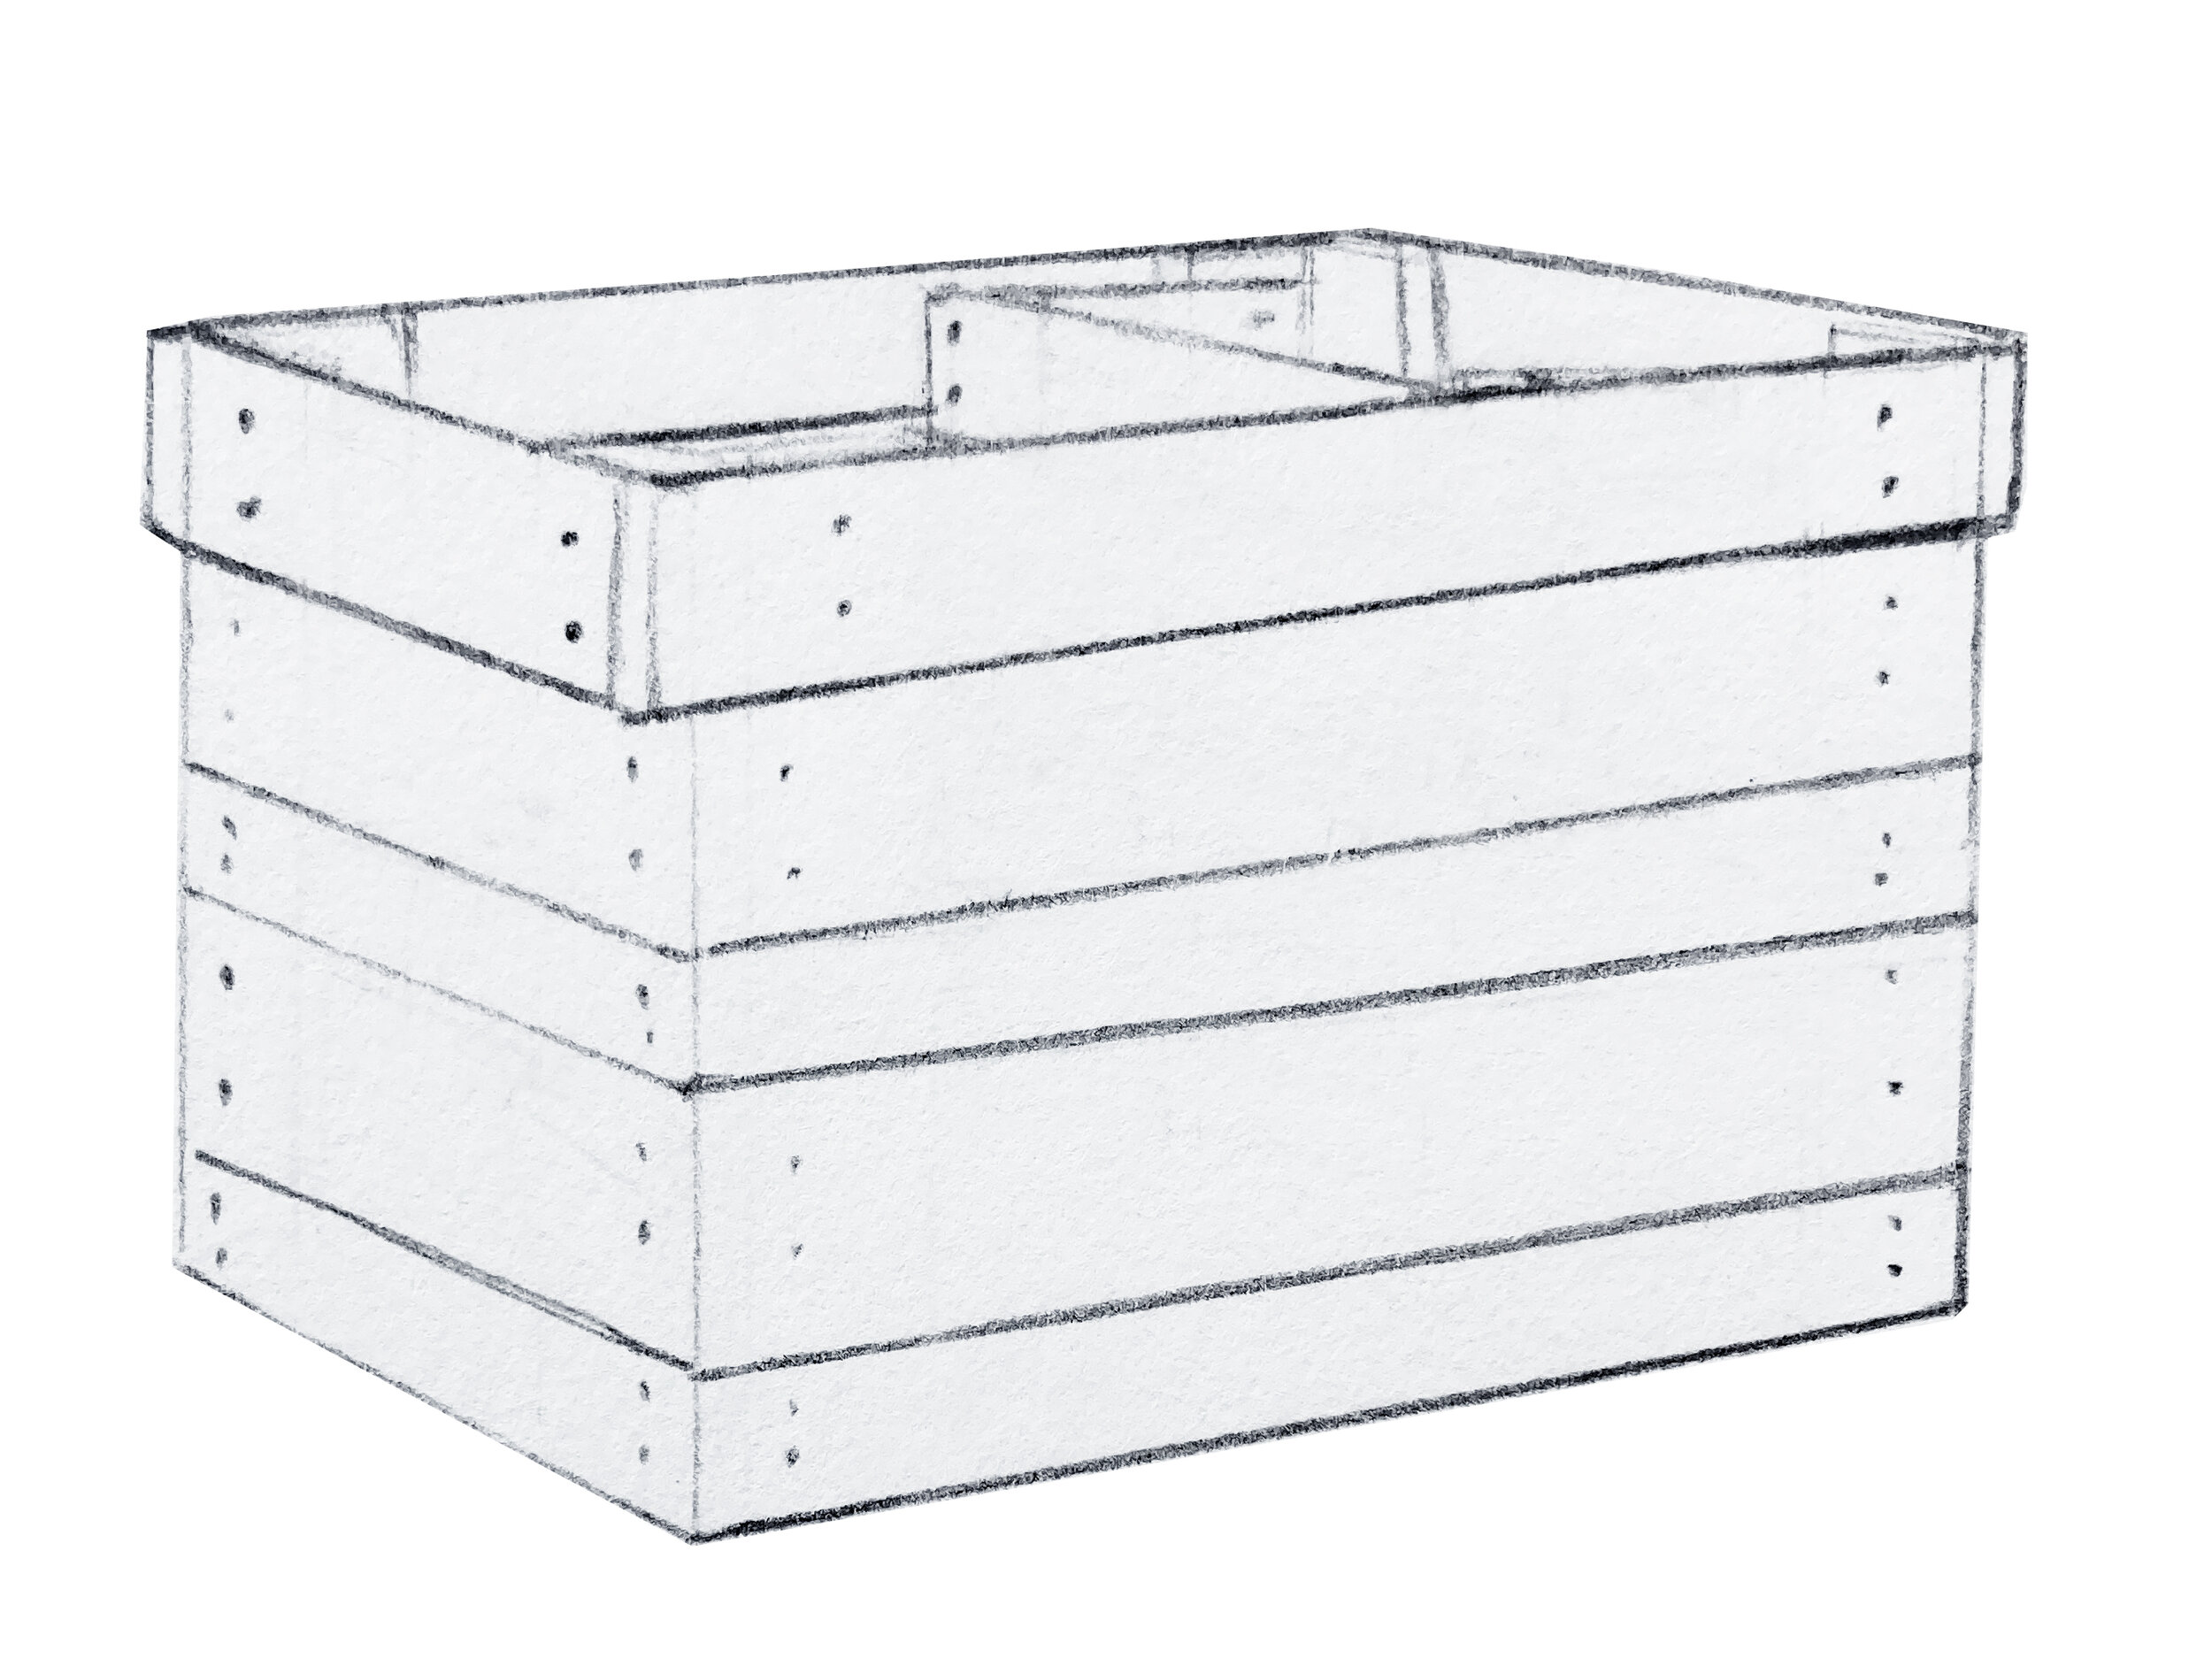
Wrap the top of the table
Measure the short side of the table from corner to corner, then cut two cedar 1x4’s at that length. Attach to the top of the corner uprights using 1 1/4 in exterior screws or 18guage brad nails (if you don’t want to see the screws). Do this on both short sides. Now measure the long sides, including the pieces you just attached. Cut two lengths of 1x4 at that measurement and attach those to the long sides of the table.
Step 6:
Sheath the outside of the table
Using cedar fence boards (I used both 5.5in wide and 3in wide fence boards) repeat the process you just did for attaching the 1x4s to the top. Use an 18 gauge brad nailer to put two nails in each side of each board to attach them to the corner uprights. I put a small gap between each board (the width of a carpenter’s pencil).

Step 7:
Create the table top
The table top is made out of cedar 1x4s. I had my table top over hang about a half inch on either side, so my 1x4s were cut 1 inch longer than the depth of the table. For the side that isn’t hinged, you just attach the 1x4s to the base. You can do this with brad nails from the top, or if you don’t want any fasteners showing on the top (which I didn’t), you can use pocket screws to screw the table top boards on from below.
I used flat brackets and 3x4in screws to attach all the hinged table top boards together, which is a bit inelegant, but works great. You could also use pocket screws to screw the boards together side by side.
Once your hinged table section is created all you have to do is attach it to the base using a couple small hinges!


Hi, I’m Liz
I'm an artist, writer, designer, DIY renovator, and … well basically I like to do all the things. If it’s creative I’m probably doing it. I’ve spent over 30 years voraciously pursuing a life steeped in creativity and I wholeheartedly believe creativity and joy are inextricably linked.
Read more…


Explore The Archive
- January 2025
- December 2024
- August 2024
- July 2024
- May 2024
- April 2024
- January 2024
- December 2023
- October 2023
- September 2023
- July 2023
- June 2023
- May 2023
- April 2023
- March 2023
- February 2023
- January 2023
- December 2022
- November 2022
- October 2022
- August 2022
- June 2022
- May 2022
- April 2022
- March 2022
- November 2021
- October 2021
- August 2021
- July 2021
- May 2021
- January 2021
- November 2020
- October 2020
- September 2020
- August 2020
- July 2020
- June 2020
- May 2020
- April 2020
- February 2020
- January 2020
- November 2019
- October 2019
- August 2019
- July 2019
- June 2019
- May 2019
- April 2019
- February 2019
- January 2019
- December 2018
- November 2018
- October 2018
- September 2018
- August 2018
- July 2018
- June 2018
- May 2018
- April 2018
- February 2018
- January 2018
- November 2017
- September 2017
- August 2017
- July 2017
- June 2017
- May 2017
- April 2017
- March 2017
- February 2017
- January 2017
- December 2016
- November 2016
- October 2016
- September 2016
- August 2016
- June 2016
- May 2016
- April 2016
- March 2016
- February 2016
- January 2016
- December 2015
- November 2015
- October 2015
- September 2015
- August 2015
- July 2015
- June 2015
- May 2015
- April 2015
- March 2015
- February 2015
- January 2015
- December 2014
- November 2014
- October 2014
- September 2014
- August 2014
- July 2014
- June 2014
- May 2014
- April 2014
- March 2014
- February 2014
- January 2014
- December 2013
- November 2013
- October 2013
- September 2013
- August 2013
- July 2013
- June 2013
- May 2013
- April 2013
- March 2013
- February 2013
- January 2013
- December 2012
- November 2012
- October 2012
- September 2012
- August 2012
- July 2012
- June 2012
- May 2012
- April 2012
- March 2012
- February 2012
- January 2012
- December 2011
- November 2011
- October 2011
- September 2011
- August 2011
- July 2011
- June 2011
- May 2011
- April 2011
- March 2011
- February 2011
- January 2011
- December 2010
- November 2010
- October 2010
- September 2010
- August 2010
- July 2010
- June 2010
- May 2010
- April 2010
- March 2010
- February 2010
- January 2010
- December 2009
- November 2009
- October 2009
- September 2009
- August 2009
- July 2009
- June 2009
- May 2009
- April 2009
- March 2009
- February 2009
- January 2009
- December 2008
- November 2008
- October 2008
- September 2008
- August 2008
- July 2008

VISIT THE SHOP


PRIVACY POLICY & DISCLOSURE
We are a participant in the Amazon Services LLC Associates Program, an affiliate advertising program designed to provide a means for us to earn fees by linking to Amazon.com and affiliated sites.